Even though I am not a paid science teacher at the moment, I still have a passion and love for science. Specifically, experiments.
So one night, while perusing Pinterest, I came across this pin about an all natural hair rinse.
The idea is that instead of using harsh chemicals to clean your hair, all you really need is a simple baking soda rinse. This particular recipe also included rosemary and mint, for scent purposes I assume.
So I thought, why not? I stay at home now, so my hair doesn't really matter on most days. I had to try it. FOR SCIENCE! I did it for science.
I am one week in and here is my scientific conclusion:
Use regular shampoo for a squeaky clean feeling and regular conditioner for soft hair.
Use this all natural baking soda rinse if you want to run your fingers through your hair and feel like you just got done digging around in the garden.

Friday, September 28, 2012
Thursday, September 27, 2012
Befores and Afters
First, can I just say how I am NOT OK with the sandbox in our backyard? And I'm not all that OK with sandboxes in general. I think they're gross, and they attract things that make my skin crawl. Like bugs, and stray cats. (But I'm ok with house cats, don't get me wrong.)
EFFECTIVE IMMEDIATELY, I am going to "do something" about that sandbox.
Also, off topic:


EFFECTIVE IMMEDIATELY, I am going to "do something" about that sandbox.
Also, off topic:
Thanks Kathy Lee and Hoda for sharing! This makes me laugh 1) Because it's funny and 2) It's a bunch of engineering students and you can see that some of them are clearly annoyed that their test was interrupted. Case and point, check out the guy at 3:50 on the bottom of the screen.
Now it's time for befores and afters! I love putting a before and after side-by-side so I can see how much progress we've made. It's one reason I love vacuuming! Or, it's one reason I love the idea of vacuuming!
A while back, I shared my plans for our living room here.

Here's what it looked like before. Like way before...like previous owners before.

Here it is currently. For some reason, that wall color looks green, but it's grey. The reason is because I keep using my iPhone to take pictures.
The room is pretty bare for now, but that's where we're at. Now we just need curtains, things on the wall, lamps on the console, yadda yadda.
NEXT! The office!

Previous owners sitting/music room

Current office
I painted the office and now it also needs to be decorated/organized. This room has no closet, which is a bummer. Our old office had a closet and we hid so much junk in there. Now we actually have to organize things and put them away.
Basement!

Before: Dark man cave

After: Fam cave! (Kudos to Kennedy for coining this phrase)
Also, just to brag about Kennedy's skillz (yes I did), let's see some during photos. He's amazing.

First, he had to patch up a bunch of places where wires were embedded into the walls and then painted over. Then, he wired his sacred surround sound BY HIMSELF. I'm impressed he knows how to do this, let alone makes it look professional.

Kennedy painted over alllllll that red, which took him forever. Then he added the wood planking per my request. He's sweet to me.
Here it is again, all done. Except that now we need to decorate in here too.
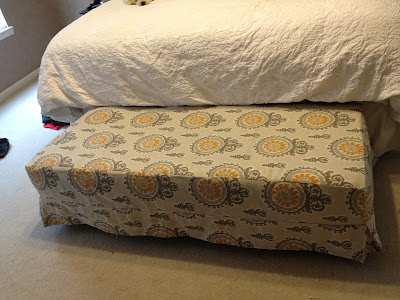
One last before and after that's not a room, but an upholstered bench! I shared on the last post the fabric I bought for this upholstered bench at the end of our bed.
Well, I did it. And I am patting myself on the back because sometimes I buy fabric and then I just don't get around to doing the project ever. It actually did not take that long all together, but there were lots of interruptions. So I did a little at a time over a few days.
Here's the bench BEFORE.

Here it is looking all sad and stained and gross. Also, one of the dogs chewed a button off the top, and the foam is a bit askew after Cece claimed it for her bed a while back.

Here's the new slipcover! I heart slipcovers because they fit in the washing machine. Whereas, that bench does not.
So hooray for us, making progress on the house! I can't wait for it to all be decorated the way I want so I can enjoy it.
Friday, September 21, 2012
Progress City
I'd say 30-35% of my day is spent letting the dogs in and out and then wiping their paws each time. Times 3. I thought I'd be done keeping a giant towel by the back door since we don't have a pool anymore. WRONG. If anything, I am wiping WAY more dog paws than I ever had to before. Indiana is very dewey.
50-65% of my day is spent with Campbell. I swear he gets cuter every day. He is going to have a rude awakening when he gets to Kindergarten one day and people aren't kissing his cheeks all day or nuzzling his neck. Here's to hoping being overly affectionate isn't doing more harm than good.
That leaves me with 0-20% of a day to do THINGS. Like sweep the floors. Or make baby food (not as time consuming as I thought it would be, thank goodness!) OR EAT. Geez, can a girl get a minute alone with her sandwich? I blame the dogs.
Anyway, I somehow managed to get some fun projects done that are helping me to feel more at home. Also, they're motivating me to do MORE things elsewhere in the house.
First up, my Campbell's Soup collage!

A friend posted an instagram picture of these LIMITED EDITION Andy Warhol soup cans available exclusively at Target. And I knew I had to have them.
I literally handed the baby to Kennedy and said "See ya!" I didn't want to miss out. P.S. I think they're still there, unless they sold out. I was lucky to score 4 different cans. Then I carefully took the labels off, cut all the boring nutrition info off, and framed them for the kitchen. Yay! I love Campbell's and Campbells and Campbell. (That is, respectively; the soup, the family, the baby).
Thanks iPhone 4s for the crappy blurry photo. Why can't you be an iPhone 5?

Then I got homesick. I started to miss the stripes from our old guest bathroom. So I striped up the mini-hall that leads from the kitchen to the laundry room. And the entire time I sang "I Got Stripes" by Joaquin Phoenix as Johnny Cash in Walk the Line. Kennedy loves when I sing that.
Here they are!


And here they are peeking out at me when I'm in the kitchen and creepily staring at the hallway. I can't wait to have white cabinets.
Now, don't sit there all judgy, like, "That's it?" Shut up if you think that, because it's rude. I also painted the entire office. However, I don't have a picture of it yet. It's too dark in there at night. And before you tell me to turn the light on, THERE IS NO LIGHT IN THERE. So you'll have to wait til later.

Today I bought this fabric at Hobby Lobby, and I'm in love. It is currently pre-washing, and then I'm gonna sew a much needed slipcover for an upholstered bench we have at the foot of our bed. The dogs have ruined it.
Sometimes, if I happen to have a quick free moment, I look at pictures like this and shed tears of joy.

He was literally born perfect.
Sunday, September 16, 2012
Kitchen words
I have different sets of words for different situations.
There are my casual words that I use in conversation with people I know really well:
- "Iunno" - I don't know
- "Meh" - I don't care
- Kennedy says I scoff anytime I have to get up and do something I don't want to do, but he "doesn't know how to spell that."
- "Oooooooh yeah!" - Good idea! or I want that!
I have my driving words, which are not to be repeated in a public forum. Now that I think about it, I have dog words that are very similar.
There's obviously professional language, which I don't have much need for these days, but I still like to practice it on retail professionals.
Let's not forget baby talk! Sometimes I accidentally baby talk the wrong things, which can get awkward. And if you're a victim of it, I'm sorry. I went my whole life ridiculing those who baby-talked. And now here I am.
Isn't language funny?
So anyway, I made a sign for my kitchen. It appropriately reminds me to "EAT" and is strategically placed over my pantry door. Aren't I funny? Like I'd ever forget to eat...
STEP 1: Buy these cardboard/paper mache letters at JoAnn Fabric - I got the 12" size, I think they have some smaller as well.

STEP 2: Paint them.
STEP 3: Hang them in a redundant place (like above the pantry!)

I would've done Bon Appetit, but it cost 3 times as much.
Thursday, September 13, 2012
DIY Statement Necklace -or- How to get a drool bib to match your baby's
So lately, my entire world has revolved around this:


.jpg)


Look at those abs.
HENCE ("Yeah, hence!" Michelle will know what I'm quoting there....) I needed something to soothe his little teefers (Sorry for baby talking on my blog. Can't help it.) all the while forcing him to need me even more than he already does.
C really likes to chew on a couple of big-beaded necklaces I already have (and leave a large drool bib on my shirt at the same time), so I came up with the idea to go buy some giant wooden beads and string them on a rope of some sort and voila! A teething necklace. Not to be confused with this one, which I hear actually works really well. Problem solved. Off to JoAnn I went.
With wooden beads in hand, I was ready. But something in the back of my mind (I later decided it was my fashion conscience) told me that I didn't have to settle for wooden beads. I could get something with color! Something to wear even when the boy has all his teeth!
And thus, a statement necklace was born.

Ignore my wrinkled shirt. Please?
This necklace is EASY, and CHEAP. The thing about it is, I only needed 2 things to make it, and it's made to be super durable and strong. Strong enough to be chewed on, slobbered on, pulled, etc. You get the idea.

$7.57 pre-tax, of course.
MATERIALS: 2 strands of acrylic beads, 1 skein (???) of embroidery floss in a coordinating color. Or contrasting color! Maybe I'll try pink and orange next!
1. The first thing I did was count out the beads and line them up. I knew I wanted 3 strands, and decreasing in number so I could get a nice curve to give me a bib effect.
2. Then, I got my embroidery floss and cut. I had 3 double strands (by double strands, I mean that I actually tied 2 strands together to make one. They were about 4 ft long each. You will need all this length later, so feel free to make it longer, but any shorter and you will have a nice statement choker or bracelet.

Steps 1 & 2
3. String your beads. Now you have 3 beaded strands. I think I had one with 15, 13 and 11. So I reduced by 2. I also left one bead off to use for the closure. Just slip the bead into a loop, ta-da! It will depend on the beads you get and how you want it to be shaped.
After I strung the beads, I held them up to see if I needed to edit it at all.

4. Find the center of one strand and place your center bead there. Then, tie a knot on either side of the bead.

Center bead with knots on either side.
5. Continue tying knots on either side of the rest of the beads. Repeat for every strand. This will keep your beads from sliding around on the floss, and will also reinforce the floss so it doesn't fray and break over time. You can skip this step, but your necklace might not hold up to the enzymes in your baby's saliva. Just sayin'.

A completely knotted strand.
6. Line up the beads on one side of your necklace so they are even. Tie all 6 strands of floss together in one knot.

Like so.
7. Line up the beads on the other side. You will now have some bibbage going on with the necklace. That's OK. Make sure to line up the beads the same way , or the necklace will be crooked and homemade-looking.
I LOVE THIS NECKLACE because all you're gonna do the rest of the time is just tie a bunch of knots. The great thing is that you can undo the knots if you mess up. Like if you ignored step 7 because you wanted to find out for yourself just how bad you can make it look. Kidding. But don't ignore step 7.
Ok, now, to finish the necklace, you need to know how to make a friendship bracelet. Here's a quick picture tutorial to show you how to tie your knots.
What I decided to do to break up the monotony was the following "pattern".
-35 "friendship knots"
-1 large knot with all 6 strands together
-35 "friendship knots"
-1 large knot with all 6 strands together
-20 "friendship knots"
-1 large knot
-15 "friendship knots"
-1 large knot
-STRING ONE BEAD on one side of the necklace
**I did the exact same thing on the other side, but then where I would have strung a bead, I braided the remaining strands together and tied it into a loop just big enough for the bead to slip through.
If you need more clarification, let me know. Now go make a necklace and send me a picture of it so I can get more ideas.
Thanks and I love you.

Here it is from my good side. Ha.
Wednesday, September 5, 2012
New House: The Basement!!!!
I'm pretty excited about having a basement. It's probably because there are no windows down there, so I can just hole up and watch TV for hours on end. (Not that that is a reality any more, but the idea is nice!)
I originally put this post on hold because a lot of potential disasters were thrown our way before we closed on the house. I was afraid I had jinxed it because I was blogging about my plans for the house before it was our house. So I stopped. Then the boxes. Then the flood. Then the fans.
So now we are here. And still with the boxes, but I need a break from those.
Here's the basement!


I won't say I've got a theme planned, but I have a "concept" for the room. I want a light, coastal feel (aka beach theme.) The red walls will get a treatment kind of like this:

Except I think we decided to do them vertical and spaced out way more. Same effect, WAY LESS WORK. Also, everywhere that is red will be painted with white. Weird for me to paint a wall white, but as I mentioned before, there are no windows down there, so it's pretttttty dark.
When we moved in, the couch we had planned to put down there did not fit down the stairs. BUMMER for me, because I'm cheap.
Anyway, we had to buy a new couch, and guess what? We got a sectional. Because we are sectional-aholics. But it was the only way to ensure that it would fit down the stairs. The sectional looks somewhat like this, although the configuration is a little different, as well as the fabric (we got a microfiber that feels/looks like velvet) and it's a little lighter grey than this one.

We also purchased a new TV console for the room which I LOVE but am too lazy to take a picture of at the moment. It's long and low and has a greyish driftwood finish.
What am I most excited about for this room, you want to know? Well, we just happen to have an extra mini-fridge and microwave lying around, so I am going to make a snack bar! I'm way too excited about these snacks, and in preparation for this snack bar, I have been pinning lots and lots of dessert popcorn recipes.
My name is Sara and I like to set up my house so that I never have to leave it. (If you knew me during my freshman year of college, you know what I'm talking about.)
Tuesday, September 4, 2012
Goal Setting
Ding-dong, the Serve Pro fans are gone! That's not to say that the problem was solved. We have some buckled floors which will have to be replaced. Currently, the refrigerator is still displaced in the dining room, along with one of the cabinets they ripped out. We have to wait for the floors to be fixed to put those back. I will take it though! I can HEAR THINGS in my house again. I feel like I've recovered from temporary deafness, and I am feeling free!
In lieu of my most recent victory, I have made a goal list for the day and have made some progress. See my list below.

In addition, I am including some photos of DIY inspiration I took while out shopping last weekend. Can't wait to make these things for our house! But alas, I must get item 1 done off my goal list before I will allow myself any DIY fun.
Also, I will soon be sharing the office and basement plans, so stay tuned!


Subscribe to:
Posts (Atom)